Building a REST API in One Weekend Simple Example

Have you ever looked at a website or an app and wondered how the data magically appears? Like when you check weather information, your banking details, your messages or even your food delivery status. All of that runs because something behind the app is constantly talking to the front end. That something is usually a REST API.
I still remember the first time I tried to build one. It was a Saturday afternoon, my coffee was getting cold and the code editor felt like a puzzle box that refused to open. But the moment the first endpoint responded with a simple message, something clicked. It felt like unlocking a new superpower. And the best part is that you can learn building a REST API in one weekend simple example without getting overwhelmed.
Today, I am going to walk you through the entire journey just like a friend helping you out on a quiet weekend coding session. No stress, no heavy jargon, just a smooth understandable flow. If you have ever wanted to create your own backend for apps or websites, this is the perfect starting point.
Let’s dive in.
Why Learn to Build a REST API
Before writing code, it helps to understand why learning to build an API is such a valuable skill today.
1. APIs are everywhere
Every modern app uses APIs. Whether it is social media, streaming platforms, maps, shopping apps or fitness apps, everything runs through an API.
2. It gives you backend power
When you know how to build an API, you can create your own server, your own logic and your own data flow. It gives you the freedom to build websites, apps, dashboards or automation tools.
3. It improves your job opportunities
Backend development skills are highly valued in the tech world. Even knowing how to create a simple REST API can get you freelance work or help you crack interviews.
4. It connects your ideas
Maybe you have a business idea or a small personal project. A simple API makes your idea functional.
Learning to build one in a weekend is not impossible. It is actually fun once you get the hang of it.
What You Need Before Starting
To keep things simple, here is all you need:
- A computer
- Basic understanding of JavaScript or Python
- A code editor like VS Code
- Node.js installed if you use JavaScript
- Postman or any API testing tool
- A little patience and curiosity
You do not need to be an expert at coding. You only need to understand how functions work and how to read error messages calmly.
This guide will use Node.js with Express because it is extremely beginner friendly. But the same concepts apply even if you use Python, PHP, Java or Go.
Understanding How a REST API Works
Let’s simplify the concept.
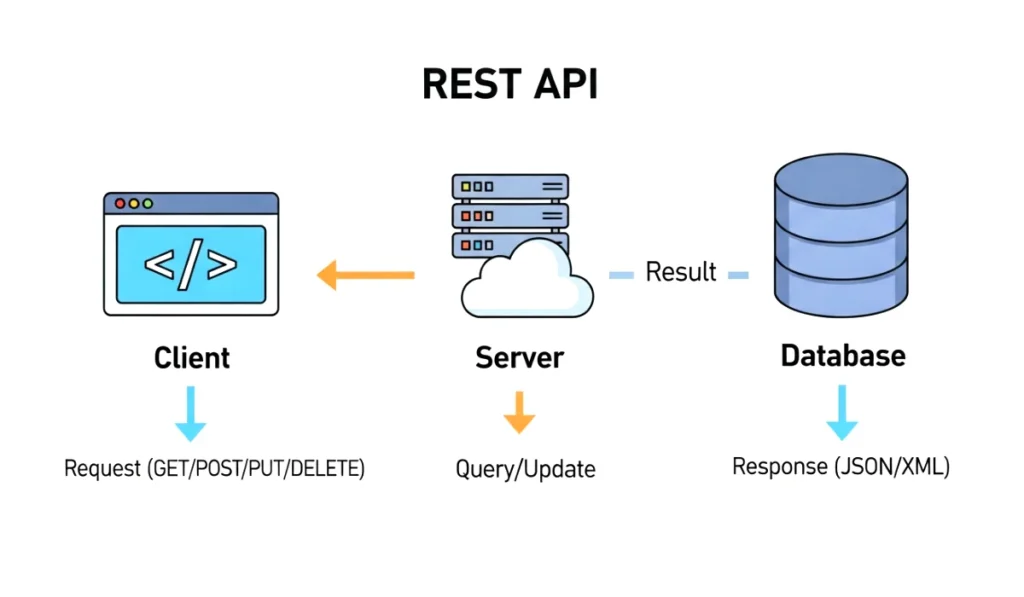
Imagine a waiter in a restaurant. You ask for food. The waiter takes your request to the kitchen and brings the response back.
That waiter is your REST API.
Your front end (app or website) sends a request to the API.
The API then:
- Receives the request
- Checks what the client wants
- Fetches or manipulates data
- Sends a clear response back
The key parts of a REST API include:
- GET request: fetch data
- POST request: add new data
- PUT request: update existing data
- DELETE request: delete data
Understanding these four gives you the entire foundation.
Now let’s create something practical.
You can also read : Developers Are Secretly Using These 10 VS Code Extensions To Work Faster Than Ever
Setting Up Your Project
Here is how to start your project from scratch.
Step 1. Create a folder
Make a new folder anywhere in your system. Name it something like weekendApi.
Step 2. Open VS Code
Open that folder in VS Code.
Step 3. Initialize your project
Open the terminal and type:
npm init -y
This creates a package.json file for your app.
Step 4. Install Express
Express is the simplest way to create APIs.
npm install express
Step 5. Create your main file
Make a file named:
index.js
Open it and write this basic starter code:
const express = require("express");
const app = express();
app.use(express.json());

app.listen(3000, () => {
  console.log("Server is running");
});
Now run:
node index.js
Your server is live. That is already a huge step.
Creating Your First API Endpoint
Let us create something that responds when you visit a specific link.
Inside your index.js, add:
app.get("/", (req, res) => {
  res.send("Welcome to my weekend REST API");
});
Now go to your browser and type:
http://localhost:3000
You should see the message appear.
That little moment feels like magic. Your first endpoint is alive.
Adding More Functionality
Let us build a small example API with a list of tasks.
1. Create sample data
Inside index.js:
let tasks = [
  { id: 1, title: "Learn API basics" },
  { id: 2, title: "Build the first endpoint" }
];
2. GET all tasks
app.get("/tasks", (req, res) => {
  res.json(tasks);
});
3. Add new task with POST
app.post("/tasks", (req, res) => {
  const newTask = {
    id: tasks.length + 1,
    title: req.body.title
  };
  tasks.push(newTask);
  res.json(newTask);
});
4. Update a task with PUT
app.put("/tasks/:id", (req, res) => {
  const id = Number(req.params.id);
  const task = tasks.find(t => t.id === id);

  if (!task) return res.status(404).send("Task not found");

  task.title = req.body.title;
  res.json(task);
});
5. Delete a task with DELETE
app.delete("/tasks/:id", (req, res) => {
  const id = Number(req.params.id);
  tasks = tasks.filter(t => t.id !== id);
  res.send("Task deleted");
});
Just like that, you now have a basic CRUD API up and running.
You can test all these endpoints using Postman or any API testing tool.
Testing Your REST API
Testing is important because it shows you what works and what needs adjustment.
Tools for testing
- Postman
- Thunder Client for VS Code
- Curl commands
When testing, check:
- Does GET return the right data?
- Does POST add new data correctly?
- Does PUT update the right item?
- Does DELETE remove the item?
- Do you get proper error messages?
Watching your API respond is incredibly satisfying. It is like watching your code communicate fluently with the outside world.
Common Mistakes Beginners Make
To save you time, here are mistakes I made when learning:
1. Forgetting to use express.json
Without it, your API cannot read JSON data from POST or PUT requests.
2. Not restarting the server after changes
Node.js does not refresh automatically unless you install nodemon.
3. Missing error handling
Always return useful messages.
4. Confusing ids
Make sure your IDs are numbers, not strings.
5. Not following REST principles
Each endpoint should do only one job.
Fixing these early helps you write cleaner code.
Final Thoughts on Building a REST API
And that is it. You just learned how to start building a REST API in one weekend simple example, step by step, with no confusion and no boredom.
You saw how a REST API works, how to set up your environment, how to create endpoints and how to test them. These foundations give you the power to build bigger projects in the future.